jetson nano, baby steps

Ubuntu 18.04 desktop running on the Jetson Nano and LG 34UM61 monitor

I turned 66 earlier this month and in the process hit official retirement age. Guys who are rich enough usually go out and get something really blingy, like a new set of golf clubs or a deep sea fishing set, or something equally expensive and self-indulgent. Me, I went out and spent a whole $99 on the Jetson Nano. I figured if I was going to be “retired” then I’d go back in time and work with what got me started many decades ago, an embedded system. I started out as an electrical engineer and wrote assembly language drivers and test routines for embedded systems. As time went along, I drifted deeper into writing software as the hardware side of the business moved out of Atlanta and to places like Dallas and Silicon Valley. I never went with them because I’d traveled to those places and they weren’t as enjoyable as Atlanta and the South. And I can’t knock software development as it helped pay the bills and raise a family. Now I don’t need to do that anymore and I can go back and do what really scratches my intellectual itches.

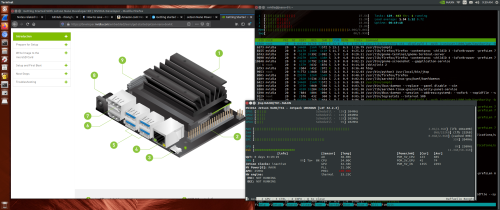
This embedded system is a whole lot different, and a whole lot more powerful, than the embedded systems I stared with in the early 1980s. Everything about the Jetson Nano is incredibly advanced from the systems available in the 1980s, starting with the 64-bit quad core ARM processor to the 128 core nVidia graphics co-processor being used for machine learning. And all for a mere $99. And I mean that. The kind of processing power and hardware resources on this board would have ranged from outlandishly expensive to impossible to obtain.

The operating system that is available with this board, a targeted version of open source Ubuntu 18.04 LTS compiled for the ARM Cortex-A57, would have cost additional thousands and been closed source with an NDA to sign on top of that.

This $99 board is a remarkable bargain of a computer. I’ve read the reviews of frustrated users who gave it one star talk about how difficult it to set up and operate. So far my experience has been nearly 100% trouble free. I’ve had a few minor bumps, but it’s been after getting the OS up and running and configuring the system. Experiences so far with this board have been as satisfying, if more so, than all my experiences with the Raspberry Pi from 2 to 4.

Now that I’m “retired” I’ll be dabbling in the uses for this board, as well as with all the other little bits and bobs I’ve been collecting now for some number of years. I’ll be able to sit back and move at my own speed without having to put it aside because I needed to go to sleep and then into work the next morning. I’m an inveterate tinkerer, and Jetson Nano is the ultimate tinkerer’s tool and toy.

raspberry pi 4b 2gb – more working observations

Arduino IDE configured to communicate with Circuit Playground Express

Working with the Raspberry Pi 4B continues. I installed the Arduino IDE version 1.8.9 (https://www.arduino.cc/en/Main/Software) and was able to quickly start it and have it working with a Circuit Playground Express. I found a sample C++ program on GitHub (https://github.com/adafruit/Adafruit_CircuitPlayground/tree/master/examples/FidgetSpinner) and created a simple project, compiling it, but not uploading it. That will come later. I just wanted to check out the basic installation to see if it worked up to a point, and it all does. My only comment is that when you download the IDE that you choose the ARM 32-bit version. It’s a standard tar file, no compression. Once untarred, then execute install.sh. It will not only place everything where it needs to be, but set up permissions, groups, and add a menu entry under Programming.

The IDE seems fully functional. One aspect of using the IDE natively on the RPi 4B with 2GB is that compiles are noticeably slower than they are on my MacBook Pro. But that’s to be expected, and the time taken is not excessive. Just noticeable.

During this period of testing I’ve also managed to force Raspbian to hit the swap space. Unlike the 1GB RPi 4B, the 2GB version’s use of swap is one to two orders less than the 1GB version with the same application load. Right now I’m seeing 4.5MB out of 2GB of swap being used, or essentially next to nothing.

Finally, I installed two more software packages, Swift for ARM and PowerShell Version 7 Preview 2 for ARM.

In order to install Swift on Raspbian Buster, you neeed to add a reference to the repo, then install Swift from that repo. Those steps are:

curl -s https://packagecloud.io/install/repositories/swift-arm/release/script.deb.sh | sudo bashsudo apt install swift5=5.0.2-v0.4

Once installed you can run this basic test:

pi@raspberrypi:~ $ swiftc --versionSwift version 5.0.2 (swift-5.0.2-RELEASE)Target: armv6-unknown-linux-gnueabihfpi@raspberrypi:~ $

You can read about Swift ARM here: https://swift-arm.com/
Note that you should check to see what the current version of Swift ARM is when you install. I chose 5.0.2-v0.4 because that was what was published in the announcement on the web site.

PowerShell Core for Raspbian Buster is available as a regular tar file here: https://github.com/PowerShell/PowerShell/releases

Once downloaded, create a directory on your login home. In my case I simply created ~/powershell. Step into it and untar the newly downloaded archive into the newly created directory. Once untarred simply run pwsh. For example:

pi@raspberrypi:~/powershell $ ./pwsh PowerShell 7.0.0-preview.2Copyright (c) Microsoft Corporation. All rights reserved.https://aka.ms/powershellType 'help' to get help.PS /home/pi/powershell> $PSVersionTableName   Value----   -----PSVersion  7.0.0-preview.2PSEdition  CoreGitCommitId7.0.0-preview.2OS Linux 4.19.58-v7l+ #1245 SMP Fri Jul 12 17:31:45 BST 2019Platform   UnixPSCompatibleVersions   {1.0, 2.0, 3.0, 4.0…}PSRemotingProtocolVersion  2.3SerializationVersion   1.1.0.1WSManStackVersion  3.0PS /home/pi/powershell> 

And that’s about it.

One more thing. The Flirc case runs warm, but not excessively so. CPU temperatures seem to run between 45°C and 50°C. I’m still working on a 40-pin ribbon cable connector that will easily fit inside the case over the GPIO header.