All of the following was done on my Lenovo IP Flex 5 13ITL6 Chromebook with 8GiB of memory, 128GiB of flash storage and a quad-core 11th Gen Intel(R) Core(TM) i3-1115G4 @ 3.00GHz.
Because I couldn’t update my existing Debian 10 container to Debian 11, I deleted my existing Debian 10 container. In the process I also removed all folders that showed up in the files application under Linux folders, and as to be expected all installed applications such as Visual Studio Code. It would later turn out that I could create another Debian container, which is a topic for a later post. Re-creating my first Debian 11 container allowed me to document the steps necessary to add additional software development tools to the container.
Once the container was installed I updated Debian 11 with sudo apt update && sudo apt upgrade -y to make sure the software was fully up-to-date. For those reading this post you’ll find a tremendous amount of older documentation where apt-get is used. The newer form just uses apt, and so can you, saving some typing. The older form is still aliased so copying and pasting instructions into a shell will still work, everything else being equal.
Once the update was finished I attempted to install htop (sudo apt install htop -y) and Visual Studio Code. In order to install Visual Studio Code you need to go to the Microsoft website and download the x86-64 Debian file (see https://code.visualstudio.com/download ). You’ll save the .deb file somewhere in your container’s home directory, and then install it with sudo dpkg -i code_1.66.2-1649664567_amd64.deb where you saved the file.
The problem with this is you’re going to get an error message from apt telling you that there are unmet dependencies for both packages. The error message will even tell you how to fix the problem. To meet those dependencies you’ll need to execute sudo apt --fix-broken install at the command line. I would recommend that if you want both, install both even though they’ll both fail, so that when you fix the broken install both of them will be fixed and installed. One last install is for Visual Studio Code. Visual Studio Code will throw a keyring error. To keep this from happening install gnome keyring: sudo apt install gnome-keyring.
While we’re installing applications, I would recommend you go ahead and install the utility tree as it’s not part of the base install. Read the man page for tree or check this online example: https://www.computerhope.com/unix/tree.htm .
Once all that is installed, you need to decide what languages you’ll develop for. Debian 11 comes with a reasonably current version of Python, version 3.9.4. So if all you want to do is Python development you can stop there. If you want to develop for another language you can install those as well. For example, I wanted to do Rust development, so I installed Rust in the container following the Rust installation instructions here: https://www.rust-lang.org/learn/get-started . To support Rust development you’ll also need to install gcc because Rust uses the local environment’s linker cc, which is a part of gcc: sudo apt install gcc. If you do install gcc you get the side benefit of being able to develop in C. If you want to develop in C++ then you’ll also need to install g++ (sudo apt install g++ -y) and make (sudo apt install make). The tool git is already installed, so if you want to keep your work up on GitHub for example (which I strongly advise) you can do so out-of-the-box.
With everything installed, including a small repo, the total footprint of everything is a little over 4GiB. And I set up my container with a 40GiB disk area, which is probably too much considering what you might do. Since I’m not going to be compiling a Linux kernel, that’s quite enough elbow room to do non-trival work.
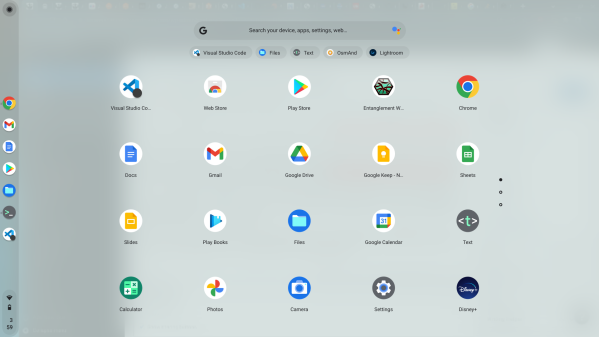
Once you’ve install Visual Studio Code you can start it from the Chromebook desktop by hitting the search key on the keyboard (that’s the key on the left above shift with the magnifying glass glyph). It should look something like this:

The icon for Visual Studio Code in my example showed up in the upper left corner. Once you start it by clicking on it, it will show up on your shelf. You can then double-finger click on it to pin it to your shelf for even easier access. My shelf runs vertically on the far left.
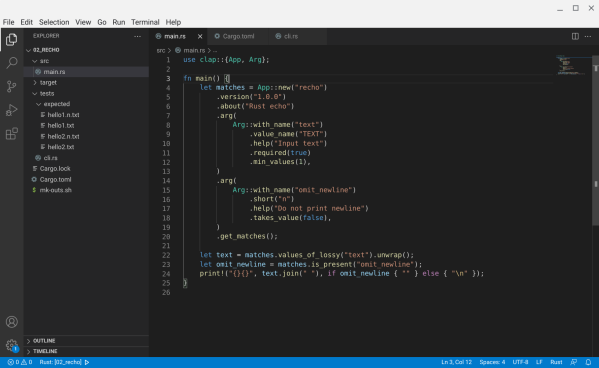
I’ve already gone to the trouble to install VS Code plugins for Python and Rust. I won’t go into that because there’s lots of detailed online help if you need that. Suffice to say that the instructions work, even on a Chromebook. In my example I’m beginning to do some Rust development.

Rust will compile and execute either at the command line or within VS Code. I’m sure there are limitations to very large projects, but for quite a bit of work there is more than enough resources to work on this Chromebook.
Why would I push a Chromebook instead of a MacBook or Windows notebook? Cost. The best bang-for-the-buck development environment believe it or not is going to be a Chromebook. A Windows notebook might reach down to what a Chromebook costs, but my reason for avoiding Windows is how Microsoft is trying to turn Windows users into another revanue source with intrusive ads and the limitations against third party applications that is creaping deeper into the OS, especially Windows 11. If you’re an independent developer a Chromebook is the best all-around compromise, especially in these times of high costs for basics and increasing inflation. You can still spend upwards of $400 on a Chromebook such as this Lenovo, but there are all sorts of interesting offers at half that amount, and who knows what you can find used.
A Chromebook like this is even a better deal than say a Raspberry Pi 4 with 4GiB or 8GiB, because you still need a keyboard, mouse and screen. And I do know all about the Raspberry Pi 400. But you can’t fold up a Raspberry Pi 400 or your Raspberry Pi rig and carry it out with you. Portability isn’t the Raspberry Pi’s forte.


You must be logged in to post a comment.