
Update 1 January 2019
This is probably one of the lamest posts I’ve ever written. I leave it here as example of how far into the weeds I tend to get. If you want to use macOS (as it’s now known) to support Raspberry Pi development, and in particular to program Linux images onto micro SDHC cards, then download balena Etcher from https://www.balena.io/etcher/ and install it. Etcher is extremely easy to use, walking you through the three steps necessary to create a bootable image on a card. Don’t do what I did below; that’s just an absolute waste of time.
Original Post
 You’re viewing CentOS 7 running in VirtualBox 5.0.16, with a micro SDHC card mounted and in turn viewing the Arch Linux ARM ext4 native Linux filesystem I created for my RP3. When I originally created the RP3 micro SDHC card I used my Ubuntu 15.10 notebook as the workbench. But I’ve been wanting to do similar work using my MBP as the primary tool bench, with an eye towards retiring the native Ubuntu notebook with the MBP due to the Ubuntu notebook’s age, rather than attempting to replace the Ubuntu notebook as I’ve written I originally wanted to do. The biggest hurdle to using the MBP was just reading the native ext4 file system on the MBP, as Max OS X has no native provisions to read Linux file systems. This post is about getting to that point. As time goes along I’ll be doing more than just reading the microSDHC, but reading (and then writing) is the foundational requirement, else this is all a waste of time and resources.
Before I go much farther let me properly attribute this from another post, “Mount SD card in VirtualBox from Mac OS X Host,” written by Brady Holt on 21 July 2014. Please note this was done nearly two years ago. This is an update to his post using contemporary software and with my observations.
Software and hardware I’ll be using:
- OS X El Capitan, version 10.11.3 running on a MacBook Pro (Retina, 15-inch, Mid 2015)
- VirtualBox 5.0.16 with Oracle_VM_VirtualBox_Extension_Pack-5.0.16
- CentOS 7 with all updates as of the date of this post with VBoxGuestAdditions_5.0.16 running as a VM
I’m going to create a Linux VM with VirtualBox and use that to mount and at least read the micro SDHC card with the Arch Linux ARM ext4 file system. I had originally looked for a Mac OS X utility to do this, but eventually gave up as the utilities that claimed they could do that had allegedly stopped working with the release of El Capitan because of System Integrity Protection, or rootless, mode. Far be it from me to disable in El Capitan what is supposed to add additional security to OS X. I’m somewhat surprised that I could get this to work, but I suppose that if, at some point in the future, Apple releases a Mac OS X update that breaks what I’ve built here that I’ll be back to using a separate Linux machine.
The first step is to install VirtualBox and then to install CentOS 7 within a VirtualBox VM. I won’t cover that here, as there are plenty of existing how-tos for that. Just make sure that the Virtual Box Extension Pack is installed and that you’ve downloaded and installed the VBoxGuesAdditions and have built it within the VM. That gets everything prepared both on the OS X host side as well as within the VM.
The next step is to get the overall system prepared to mount the RP3 micro SDHC card within the CentOS 7 VM.
- Plug in the microSDHC card into the MBP using the microSDHC adapter. I’m using a Samsung 32GB Evo Plus device. Note that it’s named “NO NAME” on the desktop. This is the MSDOS 100MB boot partition on the microSDHC card.
- Go to Launchpad and search for diskutil. Launch diskutil. Select “NO NAME.”
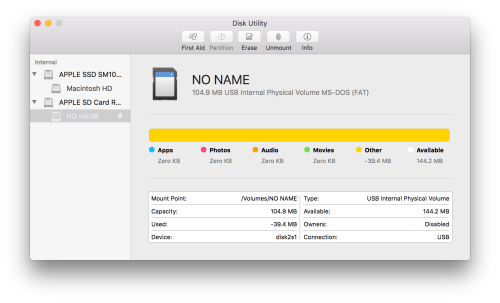
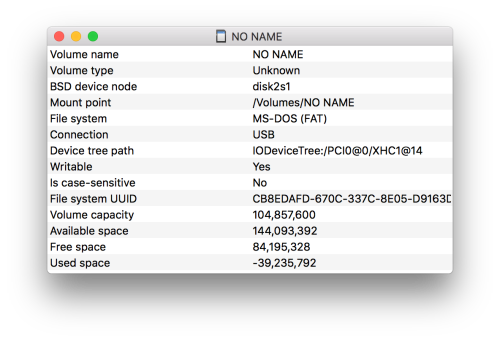
- Click the Info button at the top right. Note the device associated with “NO NAME.” It’s the third line down from the top, called “BSD device node.” In my case it’s disk2s1. The device associated with this partition is /dev/disk2. We’ll use this later.
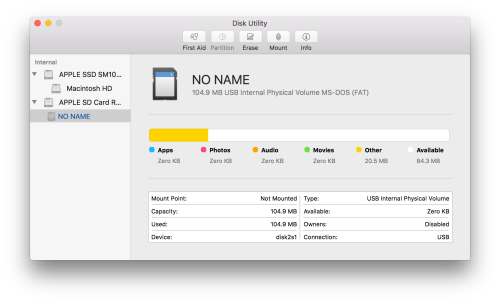
- At the top of the utility click the ‘Unmount’ button with your mouse. The button text will then change to ‘Mount.’ Please note you don’t want to eject the device, just unmount.
- Now we need to create a VirtualBox VMDK file to point to this device. That’s how we’ll get it to mount inside the Linux VM. Open a terminal and type sudo VBoxManage internalcommands createrawvmdk -filename sd-card.vmdk -rawdisk /dev/disk2 at the prompt. The file will be created where ever you run it, so my advice is to change directory to a location where you want this (or preface the file name with a full path) to create the file. Just remember where you left it.
- Change permissions on the microSDHC device and the VMDK file to 777. At the prompt type chmod 777 sd-card.vmdk /dev/disk2. This opens up permissions for the file and card to be used later by the VM
- Add sd-card.vmdk to the VM’s storage devices. In VirtualBox, under the CentOS VM, select the Storage dialog, and in the Storage Tree under Controller: SATA click the add device button. You will be prompted to either create a new device or add an existing device. Choose to add existing and add sd-card.vmdk.
- Check diskutil one more time and make sure that the microSDHC card is still unmounted. OS X has automount and can silently remount the drive. If it does then you will fail to start the Linux VM.
- Once the VM is started bring up Nautilus and note two new ejectable entries for the card, a 103MB entry and a 32GB entry. Click on the 32GB volume. You’ll be prompted by Nautilus to enter root’s password for that VM to view that volume. Once that’s done Nautilus opens into the 32GB volume. You can drag and drop files into and out of the midroSDHC’s 32GB volume. I do this to add content as well as pull log files while developing.
One caveat. If you shut down the VM and then want to bring it back up, you’ll need to unmount the microSDHC card like before and execute chmod 777 /dev/disk# again, or the VM will fail to start due to lack of permissions on the raw device.


You must be logged in to post a comment.