
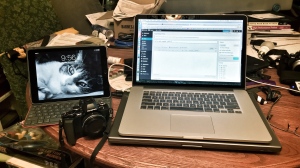
For the past year (since November 2014) I’ve been surreptitiously moving from a reliance on Windows, Linux and Android based devices to devices using Mac OS X and iOS. It started with the purchase of an iPad Air 2 in November 2014, the one to the left with the picture of Lucy on the lock screen, and continued until this November and the purchase of the 15″ Retina Macbook Pro on the right. My Olympus E-M10 is in the mix for a sense of scale. And because I like that little camera.
My shift started with my growing dissatisfaction with Android, especially how Samsung was handling Android on my Galaxy S4. Especially with regards to security updates. I have two other Android devices, a pair of 2013 Nexus 7 tablets. I’ve watched those tablets upgrade over the air from version 4.4.2 to 5 and recently to Android 6. It took a long time from Google’s announcement to OTA upgrade, far longer than Apple takes with iOS after an Apple announcement. And Samsung? It did eventually upgrade to 5, then 5.0.1, and finally 5.0.2. Complete with Samsung’s skin and apps. A mess which I was willing to put up with when I first purchased the S4, but after two years of constant exposure, it finally wore me down.
I didn’t realize at first just how dissatisfied I was becoming with Android. And yet, in hindsight, it was inevitable. That dissatisfaction was first expressed with the purchase of the iPad Air 2. At the time I was trying to decide between the iPad and a Samsung Galaxy S2 10″ tablet. The Samsung was about $150 cheaper, but was only available in 64GB maximum internal storage. After two days of vacillating I purchased the iPad with the idea of learning how to do sophisticated image post-processing while on travel. I’d purchased the Olympus E-M10 in September of that year because of a key feature, WiFi interconnectivity with any mobile device running Olympus’ OI.Share app. You could get that app for both Android and iOS. When I got the E-M10 I naturally installed the Android version on my Galaxy S4. And I was very impressed.
The problem was I only had 16GB on the S4, even though I had a 64GB micro SD card installed in the phone. OI.Share couldn’t be coerced into storing the E-M10’s images in the micro SD card, and as a consequence the limited internal 16GB began to fill. After a time I moved some of the images up to Google Drive, and some of them to Flickr, and the majority of them off to my Windows PC. It was awkward but doable, but it added additional steps to my workflow of using camera and phone together for photographic work. And I am not a fan of automatic upload to Google Drive or any other location in the “cloud.”
So in November I purchased the iPad with 128 GB of storage, a Logitech Bluetooth keyboard and cover, installed a few apps, and took the whole combination to Japan for Yama Sakura 67 in December 2014. I’d also taken my Samsung 17″ running Windows 8.1, but I’d left my primary photo storage drive, a 1.5 TB WD My Passport Ultra. I didn’t want it lost or broken. With the external drive at home I didn’t want to use Lightroom. I decided to work everything on the iPad.
The iPad worked pretty well for the most part. I discovered a lot about using the iPad for creative work, and learned to “trust” JPEGs again. That’s because there are no RAW converters for Olympus RAW files on iOS (nor on Android for that matter). In spite of some quirks, the combination was good enough that I depended on it again in April of this year on another Japan business trip, and I’m going to use it once more this December in Japan. The iPad Air 2 and the E-M10 make a portable, potent combination. With WiFi connectivity I can push my finished work up to Flickr, Instagram, and WordPress (especially blogging). And with the purchase of an iPhone 6s Plus, I can use either iDevice to pull images off the E-M10 and use pretty much the same post processing workflow. I still need the iPad with its keyboard for writing.
I was happy enough that by March I purchased a refurbished late 2012 Mac Mini Server model. That allowed me to begin to tie backups from my iPad and my wife’s mid-2012 MBP together. And it was from the Mac Mini that I grew comfortable with OS X. And that helped to ease the decision to purchase an iPhone 6s Plus to replace my Galaxy S4 in early November. That, and Apple’s Upgrade Program. With the Upgrade Program, combined with Apple’s software upgrade policy across their iOS devices, I can now maintain an up-to-date iDevice, the phone. Every year now I’ll get a new ‘S’ device. Right now my opinion of the iPhone with Apple’s custom ARM chips is that anything else is a waste of money. The iPhone is that good.
All of which led me to the purchase of the MBP. I purchased that for the express purpose of replacing, over time, my Samsung 17″ Chronos 7 notebook running Windows 10 as well as my much older Samsung running Ubuntu 15.04. The MBP is combining what I consider the best attributes of both.
 The desktop should remind Ubuntu users of Ubuntu’s Unity desktop, with the dock to the left. I chose this combination because I learned, on my Mac Mini Server, that I could have the equivalent of Windows and Linux under one environment. The key Windows feature I want and need is Office. The pieces of Office I need are Word, Excel and PowerPoint. And they work pretty much across either Windows or OS X. There is no office for Linux and there may never be. Trying to work with complex Office documents with LibreOffice, the best of the free office suites on Linux, is a recipe for slow madness. I know, I tried.

And if I need a “pure” Linux? I’ve discovered I can get that by running one or more Linux distributions on OS X via VirtualBox.
 Languages such as Oracle’s latest Java, Google’s Go, Python, and Rust are dead simple to drop into the OS X environment. The biggest and the best, Swift, is available through Xcode. And I can share, via a common folder on the OS X file system, files between the Linux VM and native tools on OS X.
Time permitting I’ll do a more detailed comparison between the individual Apple devices and everybody else. But for now I have to say I’m pretty well satisfied. It’s certainly not perfect, but it’s better than most else I’ve been dealing with over the past two-plus years. In spite of what the current critics may say, Apple’s hardware and software is more than good enough, and in many cases, better than the current state of the competition for my use. Your milage, as they always say, will vary.
For me, however, I’m all in with Apple.


You must be logged in to post a comment.