
Samsung Galaxy S4 running Android 5.0.2
Since sometime around 2011 I have dabbled with Android programming, starting with Android Honeycomb. My reasons for targeting Android 3.0 in were:
- Honeycomb was explicitly for tablets and I was very interested in the tablet form,
- Just about any device could become a developer target device without having to register with Google (unlike Apple),
- It had become “interesting” with its new additions in support of tablets,
- The Eclipse tooling seemed mature enough, and
- I had grandiose ambitions about writing the Next Great App.
That last point included the idle idea of making heaps of money, but that was quashed quickly and rather brutally by the harsh reality of the Android app marketplace.
That didn’t stop me from continuing to tinker with Android over the past few years. My hard drive is now littered with dozens and dozens of toy applications (toy in the sense that they were never launched into the marketplace). Then, one day quite recently, Google saw fit to update my two Nexus 7 2013 models with Android Lollipop 5.1 and 5.1.1 (and I have no idea why one is a point release higher than the other). I even have a Nexus 7 2012 with Lollipop 5.1.1, for all the good that older tablet can use it effectively. A Nexus 7 2012 with Android 5.1.1 is the very definition of molasses-in-January slow. A Nexus 7 2013 with Android 5.1/5.1.1 is at least usable.
Along the way to getting my Nexus 7s upgraded, AT&T upgraded my Samsung Galaxy S4 to their version of Lollipop 5.0.2. That’s what I’ll be using to test my app, rather than the larger Nexus 7 tablet. The S4’s size is about the same physical size as the HP32sII.
With the Nexus Lollipop updates came a built-in calculator app that I quickly came to loath. I don’t know who wrote it, but whomever it was has no concept of what a calculator truly is, especially regarding operational usability. Rather than merely complain about it I decided this was a golden opportunity to dig in and write my own, going by the old adage that if you think you can do better then do so.
Historical Background
I was an incoming electrical engineering freshman at Georgia Tech when the Ga Tech bookstore started to carry the Hewlett Packard HP-35 for $395. As a Georgia resident, that was about how much my tuition and books cost at the time. On my limited budget there was no way I could justify trading in my slide rule (yes, I had one of those) for the HP. But brother, I sure wanted one in the worst way.
The next spring after the HP-35 release I purchased the less expensive Texas Instruments SR-10 model 2 for $90. That lasted me for about two years until I upgraded to another wedge-shaped calculator, the SR-16. I loved those wedgies because they were built like bricks and took a lot of use and abuse. Two years after the SR-16 I advanced to the TI-58, followed rather quickly by the TI-59. After those TI models, when it came time to replace them due to heavy use, my calculator allegiance switched from TI to HP because TI had so cheapened their calculator construction in the interim. I still have working calculators from that period here at the house, but they’re an HP-16C (which I used for digital design work) and an HP-32sii (for general engineering). I have an old TI-95 Procalc I picked up at a heavy discount some point in the distant past. I bought it more for sentimental reasons at the time. It now sits in a drawer, totally unused.
The General Design
I decided to write my own calculator app, based on my experiences with both HP and TI. I did not set out to build an emulator of any particular model. What I wanted was something that fit the ethos of those calculators, especially the HP-67/HP-41C and TI-58/59 calculators. Those machines were their respective companies best of breed calculators. None before or since have quite measured up. It was one of my goals in writing my app to borrow from, but not slavishly re-create, their best ideas.
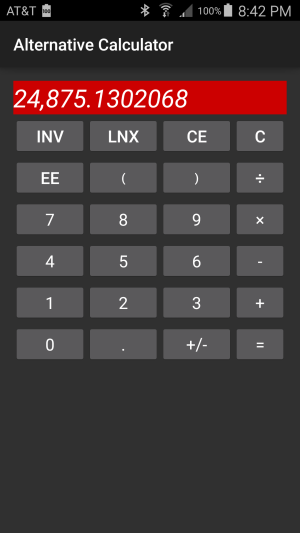
My app is based on the algebraic notation that TI also used, that is, typing in an arbitrary formula from left to right using parentheses for precedence control and ending the formula with the equals key. That’s why you’ll see those keys on my initial design. It’s a harder design as apposed to reverse Polish notation (RPN), the method used by HP. I won’t get pulled into the age-old argument as to which is better. I just decided for personal reasons to go with algebraic.
Preparatory
The application provided an opportunity to move up to writing idiomatic Lollipop applications using Google’s Material design rules. That meant moving from Eclipse to Android Studio. It also meant having to drop a lot of old coding practices. I’ve been using Android Studio since its beta releases, having created a series of (again) toy applications based on every type of starting template that Android Studio provides. For example my calculator was started with the Blank Activity template, an absolute minimal project, the Android equivalent to “Hello, World.”
I want to note that I will not be going through a step-by-step initial setup for this project. I will be talking about the issues of building this project, and what I’ve discovered along the way with using Android Studio v1.2 and Material Design, both good and bad, primarily good.
Current Functionality
The app can perform all four basic functions; add, subtract, multiple and divide. That means all the data entry keys (all numeric, decimal point), the change sign key, and the equals key work as expected. Clear (C) and clear entry (CE) keys work as expected. The Inverse (INV) and LNX (loge(x)) keys work. The keys that do not work are the Exponent Entry (EE) and the left and right parenthesis keys. You thus can’t perform full algebraic calculations nor can you enter a very large number in scientific notation, such as Avogadro’s number, 6.0221413 × 10²³. I may implement that functionality while writing these posts, but that’s the current state of the app right now after several weeks of on-and-off work (mostly off).
What’s Next
The next entry in this series will begin with a general outline of the files in the application, how the app evolved from its initial creation until now, and the problems I encountered along the way with their solutions.


You must be logged in to post a comment.