I can’t deny that a dual-core M0+ based board with built-in WiFi and Bluetooth radios for US$6 is a great bargain for tinkering with. As long as you were willing to use MicroPython, then you could program in a variant of Python all you wanted to. But I couldn’t configure the WiFi radio to be an access point. Now that there’s a version of Circuit Python that will work on this board (8.0.0.beta 4) and will work with the WiFi radio, I flashed one of my Pico Ws with this beta release and decided to give it a spin. The release notes say that I can configure the W’s WiFi as an access point. I’ve yet to try that.
Instead I decided to copy the following example code off the Adafruit site and exercise the WiFi radio with this. Note that this code uses the new .env feature, where you can create an environment file with various parameters. In this case, my WIFI_SSID and WIFI_PASSWORD are in my .env file instead of out in the open code. A very nice touch.
# SPDX-FileCopyrightText: 2022 Liz Clark for Adafruit Industries## SPDX-License-Identifier: MITimport osimport timeimport sslimport wifiimport socketpoolimport microcontrollerimport adafruit_requestsimport json# Adafruit quotes URL#quotes_url = "https://www.adafruit.com/api/quotes.php"# Connect to your local hostspot.# WIFI_SSID and WIFI_PASSWORD should be defined in your .env file.#wifi.radio.connect(os.getenv('WIFI_SSID'), os.getenv('WIFI_PASSWORD'))pool = socketpool.SocketPool(wifi.radio)session = adafruit_requests.Session(pool, ssl.create_default_context())print("Fetching quotes from ", quotes_url)print()while True:try:time.sleep(10)# Get a single quote#response = session.get(quotes_url)dic = dict(json.loads(response.text)[0])pstr = "Quote: " + dic['text'] + "."print(pstr)pstr = "Author: " + dic['author']print(pstr)print()response.close()# pylint: disable=broad-exceptexcept ValueError as e:print("Error: bad JSON - ", response.text)response.close()except Exception as e:print("Error:\n", str(e))print("Resetting microcontroller in 10 seconds")time.sleep(10)microcontroller.reset()
I can’t recall where I copied the original code, but it’s undergone a number of tweaks, in particular parsing the JSON response from the URL. The original code simply dumped the response from the website. I parsed it, created a dictionary from it, then used the dictionary to cleanly print the quote and the quote’s author on two lines. I did some other cleanup, as well as adding an exception for malformed JSON so that the board isn’t reset every time a JSON response string gets munged. And if you’re wondering why I built a string rather than just printing it, printing a complex string adds an extra space between any two strings, and I’m just lazy and use string construction to build my final string. I’m sure there’s a better way for embedded CircuitPython, and if I find it, I’ll post an update. I’m also looking to find out what other specific exceptions I need to look for. Resetting a board on all exceptions is too lazy, even for me.
What follows is a typical run.
Auto-reload is on. Simply save files over USB to run them or enter REPL to disable.code.py output:Fetching quotes from https://www.adafruit.com/api/quotes.phpQuote: The nice thing about standards is that you have so many to choose from; furthermore, if you do not like any of them, you can just wait for next year's model.Author: Andrew S. TanenbaumQuote: If you want to find the secrets of the universe, think in terms of energy, frequency and vibration.Author: Nikola TeslaQuote: The nice thing about standards is that you have so many to choose from; furthermore, if you do not like any of them, you can just wait for next year's model.Author: Andrew S. TanenbaumQuote: What I cannot create, I do not understand.Author: Richard FeynmanQuote: Invention, it must be humbly admitted, does not consist in creating out of void, but out of chaos.Author: Mary Shelley...
I like to use Raspberry Pies in embedded projects. Unfortunately, over the past 12-18 months there’s been a major shortage of Raspberry Pies of all types. That shortage motivated me to look at alternatives for embedded projects using MCU-based boards, in particular the Raspberry Pi Pico and the Espressif ESP32 series. For my needs if I concentrated on the application then I could solve my problem using MCU-based boards programmed with C++ (using Espressif’s ESP IDF) and Python. This post focuses on using MicroPython on three different ESP32 MCU boards, with a beginning attempt to make complex Python software portable across these boards. Even these MCU-based boards are going out of, and then back into, availability. I don’t want to get caught without a hardware solution if I can help it.
The MicroPython group ( https://micropython.org ) released micropython v 1.19 on 17 July 2022, followed quickly by 1.19.1 across the board two days later. I waited for an official release of Micro Python that would work across all my Espressif developer boards, releases that were not a nightly release. Because it turned out that the official release before this, version 1.18, would not work on the ESP32-S3 and ESP32-C3 based boards I purchased.
This code’s a bit more sophisticated than my basic blinky LED code. It includes blinky code as well as code that makes use of built-in WiFi and provides a very (very) simple web page that interacts with the ESP32 microcontroller boards. For this post I’m using three ESP32-based boards, all of which were purchased from Adafruit. They had them in all stock and at the lowest prices I could find. The absolute best bargain I found was for the ESP32-C3 RISC V Developer board for $9.95. The bigger ESP32-S3 boards were about double that in price.
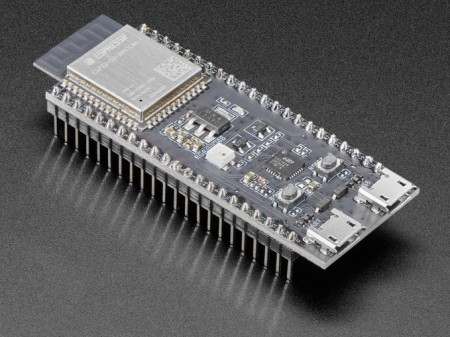
Figure 1: Espressif ESP32-S3 N8R2 developer board via Adafruit
What’s nice about the ESP32-S3 developer boards is that nearly every pin is brought out for experimentation. That doesn’t mean you should use every one in your final product, but if you’re curious it’s all there. I also like that the two micro USB ports are there to provide power on one and debugging communications on the other. The board has full 2.4GHz WiFi and Bluetooth 5. The processor is a 240 MHz dual-core Tensilica LX7. The only problem is that there is no version of MicroPython that will properly use the on-board SPIRAM.
The ESP32 Feather V2 ( https://www.adafruit.com/product/5400 ) has a an older generation 240 MHz dual-core Tensillica LX6 processor with WiFi and Bluetooth. It has 2MB of RAM and 8MB of FLASH storage to run Micro Python. Unlike the ESP32-S3, MicroPython will recognize and use the 2MB of built-in SPIRAM.
Finally we have the ESP32-C3 developer board ( https://www.adafruit.com/product/5337 ). It’s primary feature of interest to me is that it’s powered by a 160 MHz RISC-V microcontroller. I believe in the future of RISC-V and want to do my part to make it successful by purchasing any products that incorporate it. I’m also interested in the chip and want to dig down to the register level…
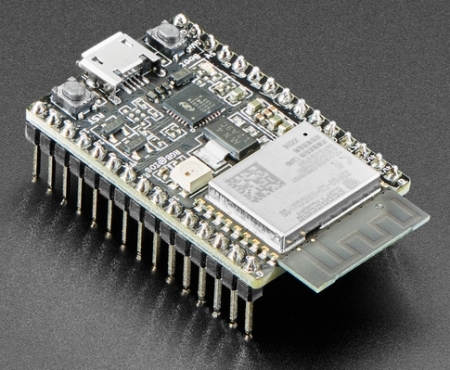
Figure 3: Espressif ESP32-C3 DevKitC-02 (image via Adafruit)
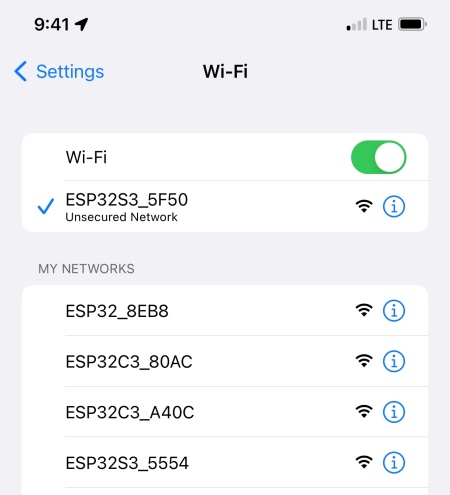
All three of the boards are running released MicroPython. The code that follows will run on all three without modification. The tricky part is getting the NeoPixel set up so that it will work on any of the three boards. Because the code uses WiFi, I’m going to show the three boards in operation before I show the code. The WiFi code is configured to act as a access point, thus they’ll show up individually on my iPhone’s WiFi configuration.
Figure 4: Boards as they appear on my iPhone.
I’ve chosen one of the boards as my access point. Here’s what it looks like on Safari.
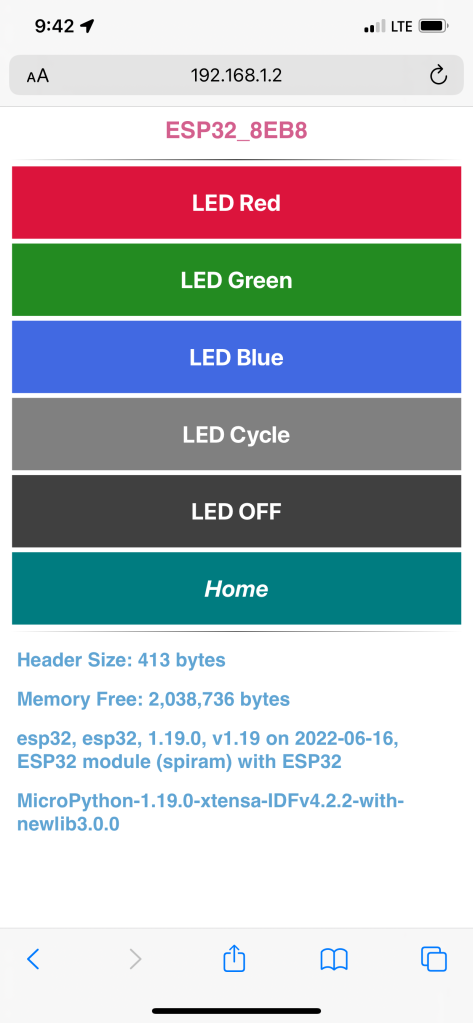
Figure 5: MicroPython main page
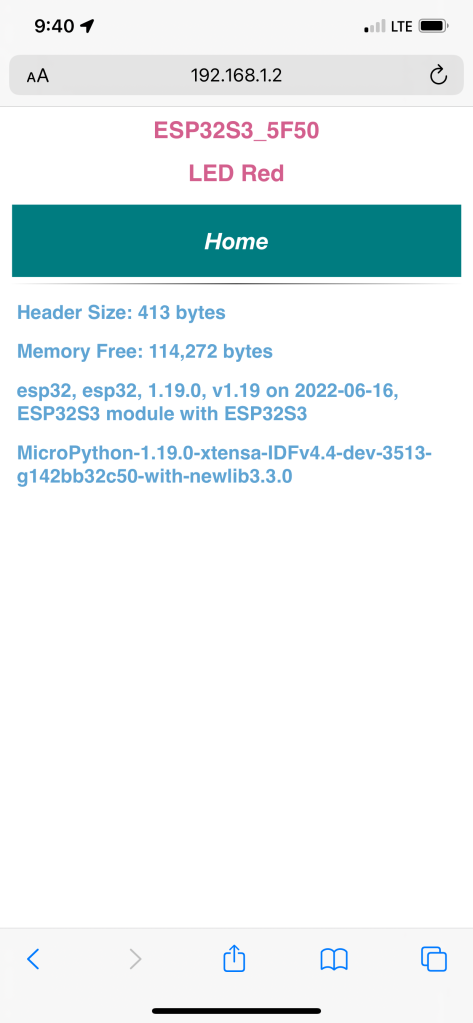
You’ll note the SSID is at the top, followed by a series of simple web buttons. Press any one of the buttons with a color and it will turn on the NeoPixel with that color. The button labeled “LED Cycle” will run through the colors red, green, blue, cyan, magenta, yellow, and then off. The “LED Off” button will turn off the color you selected with one of the top three buttons. The “Home” button is always present. For example, when I press the red button, I get this:
Figure 6: Example selecting to turn on the NeoPixel as red
I want to show what the Huzzah looks like.
Figure 7: The Adafruit Huzzah V2 showing all its SPIRAM free
Note the amount of Memory Free. This is because MicroPython for this board is capable of enabling and using the SPIRAM.
The code is in three files; main.py, config.py, and SimpleHttp.py. The config.py file is the simplest and we’ll skip that one.
The file main.py instantiates everything and gets everything going. Lines 19 through 34 is where we try to determine what board/chip combination we’re using, and setting the NeoPixel up accordingly. This is where Adafruit’s CircuitPython is superior to MicroPython; there’s is a file that if imported defines NEOPIXEL and allows that to be used in your code. Then, as you move that code block between Adafruit boards the NeoPixel is known, and portable code is much easier to write.
import machine as maimport neopixel as neoimport time as tiimport _threadimport configimport osprint(', '.join(os.uname()))import platformprint(platform.platform())import espprint("Flash size {} in bytes".format(esp.flash_size()))import gcprint("Memory free {} in bytes.".format(gc.mem_free()))name = os.uname()[-1].split(' ')[-1]if name is "ESP32S3":pinnum = 48elif name is 'ESP32':# Setup specifically for Adafruit Huzzah ESP32 V2.# Pin 0 is the data pin to the NeoPixel,# Pin 2 is the power pin that must be set as an# an output and on, or high.#pinnum = 0## Turn on the power for the NeoPixel.#pwr = ma.Pin(2, ma.Pin.OUT)pwr.value(1)else:pinnum = 8np = neo.NeoPixel(ma.Pin(pinnum), 1)neopixel_colors = [(64, 0, 0), # red(0, 64, 0), # green(0, 0, 64), # blue(64, 32, 0), # orange(0, 64, 64), # cyan(0, 0, 0)# black]def cycle_colors():for color in neopixel_colors:np[0] = colornp.write()ti.sleep_ms(400)np[0] = neopixel_colors[-1]np.write()def do_action(action_to_do):if action_to_do == config.LED_RED or action_to_do == config.LED_GREEN or action_to_do == config.LED_BLUE or action_to_do == config.LED_OFF:np[0] = neopixel_colors[action_to_do]np.write()elif action_to_do == config.LED_CYCLE:cycle_colors();#_thread.start_new_thread(cycle_colors, ())from SimpleHttp import SimpleHttpServershs = SimpleHttpServer(do_action)shs.run()
from micropython import const# Enumerations to perform a task.LED_RED = const(0)LED_GREEN = const(1)LED_BLUE = const(2)LED_CYCLE = const(3)LED_OFF = const(5)
The file SimpleHttp.py crams a lot into its 130 lines, including HTML and CSS to help render the web page on your device. I chose to create this so that the experimenter wouldn’t have to install any app on their device. As long as you’ve got something with a built-in web browser, you’re golden. Note the use of MicroPython’s _thread class in line 129. There are times when threading is needed, and I felt it was needed here. This is where MicroPython can be superior to CircuitPython.
"""This is the Simple HTTP Server.It has HTML/CSS text intermixed with Python code.It provides very limited functionality."""import binasciiimport machineimport osimport platformimport usocketimport _threadimport timeimport gcimport networkfrom network import WLANfrom machine import RTCimport configclass SimpleHttpServer:SSID = Nonedo_action = Nonedef __init__(self, do_action):self.do_action = do_actionself.name = os.uname()[-1].split(' ')[-1]self.SSID = self.name + '_' + binascii.hexlify(machine.unique_id()).decode('ascii').upper()[-4:]gc.enable()def client_thread(self, clientsocket):received = clientsocket.recv(4096)# If received has 0 bytes then the other end closed the connection.#if len(received) == 0:clientsocket.close()returnelse:# Parse the recieved data and perform any given actions.#received_str = str(received)## Uncomment the following for raw debugging purposes. Lots of output.##print("Received: {}".format(received_str))# Send out the common webpage header for all pages.#clientsocket.send("HTTP/1.1 200 OK\r\nContent-Type: text/html\r\nConnection:close \r\n\r\n")clientsocket.send("<HTML><HEAD><TITLE>{}</TITLE>".format(self.SSID))clientsocket.send("<img src="data:image/gif;base64,R0lGODlhAQABAIAAAAAAAP///yH5BAEAAAAALAAAAAABAAEAAAIBRAA7" data-wp-preserve="%3Cstyle%3E%22%0A%20%20%20%20%20%20%20%20%20%20%20%20%20%20%20%20%22body%20%7Bfont-family%3A%20sans-serif%3Bmargin%3A%2020px%3B%7D%22%0A%20%20%20%20%20%20%20%20%20%20%20%20%20%20%20%20%22button%20%7B%22%0A%20%20%20%20%20%20%20%20%20%20%20%20%20%20%20%20%22font-size%3A%20300%25%3B%22%0A%20%20%20%20%20%20%20%20%20%20%20%20%20%20%20%20%22font-weight%3A%20bold%3B%22%0A%20%20%20%20%20%20%20%20%20%20%20%20%20%20%20%20%22display%3A%20inline-block%3B%22%0A%20%20%20%20%20%20%20%20%20%20%20%20%20%20%20%20%22margin%3A%205px%3B%22%0A%20%20%20%20%20%20%20%20%20%20%20%20%20%20%20%20%22padding%3A%2020px%2060px%3B%22%0A%20%20%20%20%20%20%20%20%20%20%20%20%20%20%20%20%22width%3A%2099%25%3B%22%0A%20%20%20%20%20%20%20%20%20%20%20%20%20%20%20%20%22height%3A%20150px%3B%22%0A%20%20%20%20%20%20%20%20%20%20%20%20%20%20%20%20%22justify-content%3A%20center%3B%22%0A%20%20%20%20%20%20%20%20%20%20%20%20%20%20%20%20%22align-items%3A%20center%3B%22%0A%20%20%20%20%20%20%20%20%20%20%20%20%20%20%20%20%22text-decoration%3A%20none%3B%22%0A%20%20%20%20%20%20%20%20%20%20%20%20%20%20%20%20%22color%3A%20%23ffffff%3B%22%0A%20%20%20%20%20%20%20%20%20%20%20%20%20%20%20%20%22background-color%3A%20%23556B2F%3B%22%0A%20%20%20%20%20%20%20%20%20%20%20%20%20%20%20%20%22border%3A%20none%3B%22%0A%20%20%20%20%20%20%20%20%20%20%20%20%20%20%20%20%22border-radius%3A%200px%3B%22%0A%20%20%20%20%20%20%20%20%20%20%20%20%20%20%20%20%22outline%3A%20none%3B%7D%22%0A%20%20%20%20%20%20%20%20%20%20%20%20%20%20%20%20%22hr%20%7Bborder%3A%200%3Bheight%3A%202px%3B%22%0A%20%20%20%20%20%20%20%20%20%20%20%20%20%20%20%20%22background-image%3A%20linear-gradient(to%20right%2C%20rgba(0%2C%200%2C%200%2C%200)%2C%20rgba(0%2C%200%2C%200%2C%200.75)%2C%20rgba(0%2C%200%2C%200%2C%200))%3B%7D%22%0A%20%20%20%20%20%20%20%20%20%20%20%20%20%20%20%20%22h1%20%7Bfont-size%3A%20300%25%3Bcolor%3A%20%23D35F8D%3Btext-align%3A%20center%3B%7D%22%0A%20%20%20%20%20%20%20%20%20%20%20%20%20%20%20%20%22h2%20%7Bfont-size%3A%20250%25%3Bcolor%3A%20%235FA3D3%3Bpadding-left%3A%2015px%3B%7D%22%0A%20%20%20%20%20%20%20%20%20%20%20%20%20%20%20%20%22%3C%2Fstyle%3E" data-mce-resize="false" data-mce-placeholder="1" class="mce-object" width="20" height="20" alt="<style>" title="<style>" />""</HEAD><BODY>")clientsocket.send("<h1>{}</h1>".format(self.SSID))# Start parsing the request, performing the various actions.# If there is no defined actions for the request, tell the user.#if "GET / " in received_str:clientsocket.send("<hr/>""<a href='/func1'><button style='background-color: #DC143C'>LED Red</button></a>""<a href='/func2'><button style='background-color: #228B22'>LED Green</button></a>""<a href='/func3'><button style='background-color: #4169E1'>LED Blue</button></a>""<a href='/func4'><button style='background-color: #808080'>LED Cycle</button></a>""<a href='/func5'><button style='background-color: #404040'>LED OFF</button></a>")elif "GET /func1 " in received_str:clientsocket.send("<h1>LED Red</h1>")self.do_action(config.LED_RED)elif "GET /func2 " in received_str:clientsocket.send("<h1>LED Green</h1>")self.do_action(config.LED_GREEN)elif "GET /func3 " in received_str:clientsocket.send("<h1>LED Blue</h1>")self.do_action(config.LED_BLUE)elif "GET /func4 " in received_str:clientsocket.send("<h1>LED Cycle</h1>")self.do_action(config.LED_CYCLE)elif "GET /func5 " in received_str:clientsocket.send("<h1>LED OFF</h1>")self.do_action(config.LED_OFF)else:clientsocket.send("<h1>Undefined Action</h1>" + received_str)clientsocket.send("<a href='/'><button style='background-color: #007C80'><em>Home</em></button></a>")clientsocket.send("<HR/>")clientsocket.send("<h2>Header Size: {:,} bytes</h2>".format(len(received)))clientsocket.send("<h2>Memory Free: {:,} bytes</h2>".format(gc.mem_free()))clientsocket.send("<h2>{}</h2>".format(', '.join(os.uname())))clientsocket.send("<h2>{}</h2>".format(platform.platform()))clientsocket.send("</BODY></HTML>")gc.collect()# Close the socket and terminate the threadclientsocket.close()time.sleep_ms(500)def run(self):# create as an access point#wlan = WLAN(network.AP_IF)wlan.active(True)# configure as an access point#print(self.SSID)wlan.config(essid=self.SSID)wlan.ifconfig(('192.168.1.2','255.255.255.0','192.168.1.1','8.8.8.8'))# Set up server socket to read client responses from web pages#serversocket = usocket.socket(usocket.AF_INET, usocket.SOCK_STREAM)serversocket.setsockopt(usocket.SOL_SOCKET, usocket.SO_REUSEADDR, 1)serversocket.bind(("192.168.1.2", 80))# Listen argument defines the maximum connections at the same time.#serversocket.listen(1)#print(" HTTP: LISTEN")while True:(clientsocket, address) = serversocket.accept()# Start a new thread to handle the client#_thread.start_new_thread(self.client_thread, (clientsocket, ))serversocket.close()


You must be logged in to post a comment.