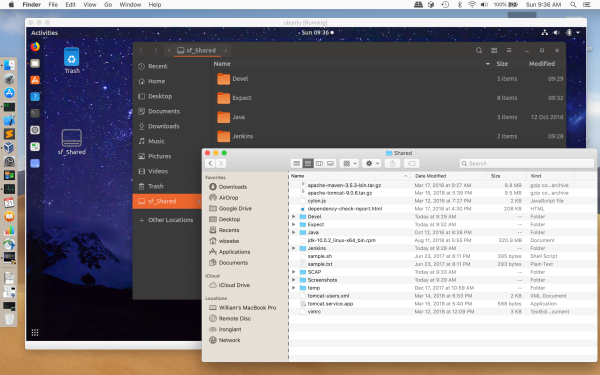
Last post I described installing Ubuntu 18.10 as a virtual machine on my Macbook Pro under macOS Mojave using Oracle VirtualBox. This post I want to describe some quick tweaks to set up and share a folder on the macOS file system with the virtual machine.
- When installing VirtualBox for the first time (and every time thereafter) make sure to install the Guest Additions. The Guest Additions allow tighter, more efficient integration of the guest VM with the host OS. It also allows for additional functions, such as shared folders between the host OS and the guest VM.
- On the macOS host side, create a folder you want to share with the VM. In my case I created ~/Shared to share. It will have no special permissions on the macOS side, just normal default read and write permissions.
- When initially creating the Ubuntu VM, in the VirtualBox section called Shared Folders, find and use the shared folder under macOS. Make sure it’s enabled read/write and automount.
- After installation and first boot, install the Guest Additions in the VM. First make sure the Ubuntu VM has the necessary build tools installed. If you performed a minimal installation (which I highly recommend) you can install those with ‘sudo apt install build-essential’.
- With the VirtualBox VM in the foreground, on the top menu (not Ubuntu’s menu), select Devices | Insert Guest Additions CD Image… A dialog will appear in the Ubuntu VM to auto run a script on the image it’s trying to mount. Simple select Cancel and allow the Guest Additions to mount on Ubuntu.
- Open a terminal and cd to /media/ubuntu/VBox_GAs_5.2.20. The path format is /media/[account]/[VBox_GAs_[version], so this path will be dependent on the account you created in the VM and the version of VirtualBox you currently have running. In my case I always create an account that’s the name of the distribution (ubuntu) and I’m currently using VirtualBox version 5.2.20 for this example.
- Inside that folder execute ‘sudo ./VBoxLinuxAdditions.run’. This will begin the process of building and installing all the necessary kernel modules for various features and optimizations. If you installed the essential build tools (or you installed everything up front) then the script will successfully execute, everything will build, and you’ll see a folder on your desktop that matches your shared folder name, with a ‘sf_’ prefix.
- Reboot.
- You’re not done yet. You need permissions on the Ubuntu/Linux side to access the shared folder. The shared folder is under /media/sf_[shared_folder_name]. it will have a group ownership of vboxsf (VirtualBox shared folder). You can sudo into it (sudo cd …) or you can add your account to the vboxsf group and avoid the annoyance. The fastest way to add your account to the group is to edit /etc/group. Open up /etc/group (sudo vi /etc/group) and find the vboxsf entry, at the very end of the file. Append your account name to the end (i.e. vboxsf:x:997:ubuntu in my case, where I added ‘ubuntu’ after the ‘:’). Save.
- Log out and log back in. At this point you can either cd into the folder or you can open up the link on your desktop.
Why do this? After all, VirtualBox supports drag-and-drop onto the VM’s desktop. The issue is duplication of files. If I want to work on the same set of files on both macOS as well as Ubuntu (think of develop and cross-testing) then I don’t want a lot of duplication (or any, actually) and I don’t want to loose track of which is more current, especially during source code development. And if I have more than one VM on my host system (and I have a half dozen at the moment) sharing a common folder is a major requirement.

You must be logged in to post a comment.