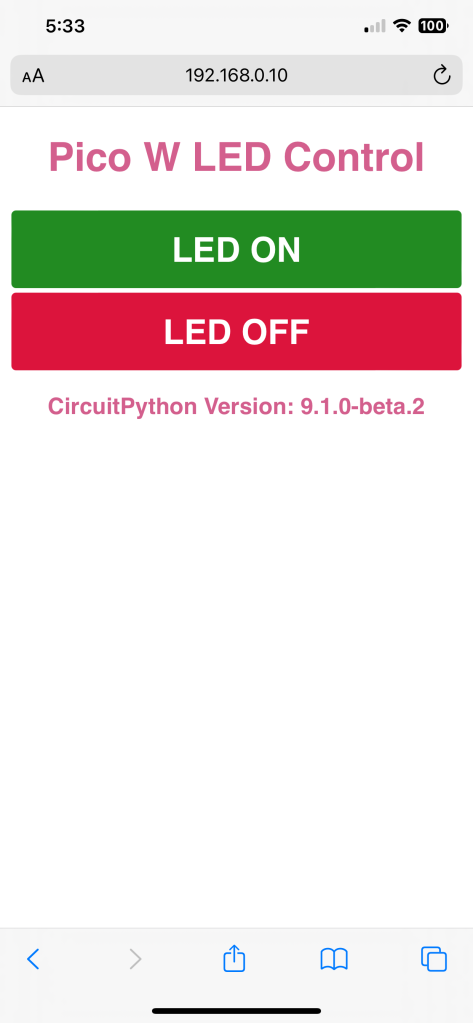
The CircuitPython group ( https://circuitpython.org/ ) has now released the third beta of the 9.1 version of CircuitPython. This is beta 2; they start at beta 0, which is different than most folks, who start at 1. Whatever, betas are betas, which are feature complete but not reasonably bug free.
All this is being hosted on a Raspberry Pi Pico W, the version that comes with WiFi support built in. I’ve been working with this combination for a while now. I did not originate the code at the end of this post, but copied it from an Adafruit project which I can’t recall and can’t locate on their site. I have stripped it down to its bare essentials, which is to simply run the web server and provide a way to turn the built-in LED on or off. I’ve done a bit of code cleanup to make it easier to extend and experiment with. Consider the code a starting point for something bigger. You will need to copy the adafruit_httpserver library onto the Pico device. You’ll find those libraries just a click away on the CircuitPython page. You’ll also need to create a settings.toml file that is resident with code.py. What to put into that file is documented in the source listing, in a comment block starting at line 18.
I’ve used both CircuitPython and MicroPython extensively. I have a MicroPython build environment for Espressif ESP32-S3 and ESP32-C3 and -C6 boards on my Linux development system. As much as I use MicroPython, I like CircuitPython because they made it much simpler to update the CircuitPython runtime as well as edit the embedded Python code. When a CircuitPython device is plugged into your computer it comes up as a file device, much like a thumb drive. All you have to do is run a communication application like minicom to talk to the device via its USB port, while you can use whatever editor you want on the source, on the device’s exposed filesystem. Every time you save an edit, the CircuitPython detects the change and restarts it automatically. Thus prototyping with CircuitPython can be a lot simpler than MicroPython.
import osimport timeimport ipaddressimport wifiimport socketpoolimport boardimport microcontrollerfrom digitalio import DigitalInOut, Directionfrom adafruit_httpserver import Server, Request, Response, POST# On-device LED setupled = DigitalInOut(board.LED)led.direction = Direction.OUTPUTled.value = False# Connect to a local WiFi access point.# Because this code is running in a CircuitPython 9 or later environment,# it requires a settings.toml file be created with at least the following# five lines:## AP_SSID = "WIFI SSID"# AP_PASSWORD = "WIFI PASSWORD"# STATIC_IP = "IP4 dotted IP address"# GATEWAY = "192.168.0.1"# DEBUG = "True" ## DEBUG can be either True or False.ipv4 = ipaddress.IPv4Address(os.getenv('STATIC_IP'))netmask = ipaddress.IPv4Address("255.255.255.0")gateway = ipaddress.IPv4Address(os.getenv('GATEWAY'))wifi.radio.set_ipv4_address(ipv4=ipv4,netmask=netmask,gateway=gateway)wifi.radio.connect(os.getenv('AP_SSID'), os.getenv('AP_PASSWORD'))print(" Connected to WiFi access point...")pool = socketpool.SocketPool(wifi.radio)server = Server(pool, "/static", debug=os.getenv('DEBUG'))# Write the HTML page body as a Python 3 'f' string for advanced formatting.## Double curly braces {{ and }} are used when HTML needs single braces for HTML# page elements such as CSS styling.font_family = "sans-serif"def webpage():html = f"""<!DOCTYPE html><html><head><meta http-equiv="Content-type" content="text/html;charset=utf-8"><meta name="viewport" content="width=device-width, initial-scale=1"><style>html{{font-family: {font_family};background-color: #FFFFFF;display:inline-block;margin: 0px auto;text-align: center;}}h1{{color:#D35F8D;word-wrap: break-word;font-size: 35px;}}h2{{color:#D35F8D;word-wrap: break-word;font-size: 20px;}}p{{font-size: 1.5rem;word-wrap: break-word;}}.button-red{{font-family: {font_family};display: inline-block;width: 99%;background-color: #DC143C;border: none;border-radius: 4px;color: white;padding: 16px 40px;text-decoration: none;font-size: 30px;margin: 2px;cursor: pointer;}}.button-green{{font-family: {font_family};display: inline-block;width: 99%;background-color: #228B22;border: none;border-radius: 4px;color: white;padding: 16px 40px;text-decoration: none;font-size: 30px;margin: 2px;cursor: pointer;}}p.dotted {{margin: auto;width: 90%;font-size:25px;text-align: center;}}</style></head><body><title>Pico W LED Control</title><h1>Pico W LED Control</h1><form accept-charset="utf-8" method="POST"><button class="button-green" name="LED ON" value="ON" type="submit">LED ON</button></a><button class="button-red" name="LED OFF" value="OFF" type="submit">LED OFF</button></a></form><h2>CircuitPython Version: {os.uname().version.split(' ')[0]}<br/>{format_ntp()}</h2></body></html>"""return html# Default route static IP@server.route("/")def base(request: Request): # pylint: disable=unused-argumentreturn Response(request, f"{webpage()}", content_type='text/html')# Determine which button was pressed and execute that button's associated# action.@server.route("/", POST)def buttonpress(request: Request):raw_text = request.raw_request.decode("utf8")print(raw_text)## If the led on button was pressed...if "ON" in raw_text:led.value = True## If the led off button was pressed...if "OFF" in raw_text:led.value = Falsereturn Response(request, f"{webpage()}", content_type='text/html')print(" Starting HTTP server...")try:server.start(str(wifi.radio.ipv4_address))print(f" Listening on http://{wifi.radio.ipv4_address}")## If the server fails to start then reset the Pico W.# If there is a hardware failure then this can put the software into a# boot loop. That's why the time.sleep(5) is there so that a Ctrl C can exit# at the REPL during development.#except OSError:print(" !!! OSError Exception, Waiting !!!")time.sleep(5)print(" !!! OSError Exception, Restarting !!!")microcontroller.reset()print(" Start polling...")## DO NOT hard code the while loop as True,# instead provide a test and exit if something goes wrong.#is_healthy = True;while is_healthy:try:# Poll for incoming requests.server.poll()except Exception as e:print(e)is_healthy = Falsecontinue

You must be logged in to post a comment.