I have over a dozen Raspberry Pis that stretch back to my first two, a pair of Raspberry Pi Model B revision 2s. Although these have the two mounting holes in the PC boards, they’re made in China and not the UK. This was followed up with a Raspberry Pi 2 Model B V1.1, and then a small collection of Raspberry Pi 3 Model B V1.2s, then a small collection of Raspberry Pi 4s going from 1 GB to 8GB, and then finally my small collection of Raspberry Pi 5, all of them at 8GB. What I chose to try and resurrect with the current Raspberry Pi OS is the Raspberry Pi 3 Model B V1.2. And I chose that one because I still had a Raspberry Pi Sense HAT Version 1 plugged into the GPIO pins. And I wanted to bring that HAT back up and work with it again. But before I could do that, I had to get the underlying Pi back up and running first.
This particular Raspberry Pi is unique in that it’s also the one I first installed Arch Linux on, and then Raspian (well before it was renamed Raspberry Pi OS). It still had Raspian installed, and when I powered it up it still booted and ran. But I wanted to install the current Raspberry Pi OS on it and try to get everything working on top of an up-to-date software platform. And so I did, and that was an interesting “learning experience” that got me wrapped around the axle a bit, to the point I still haven’t done anything with the Sense HAT.
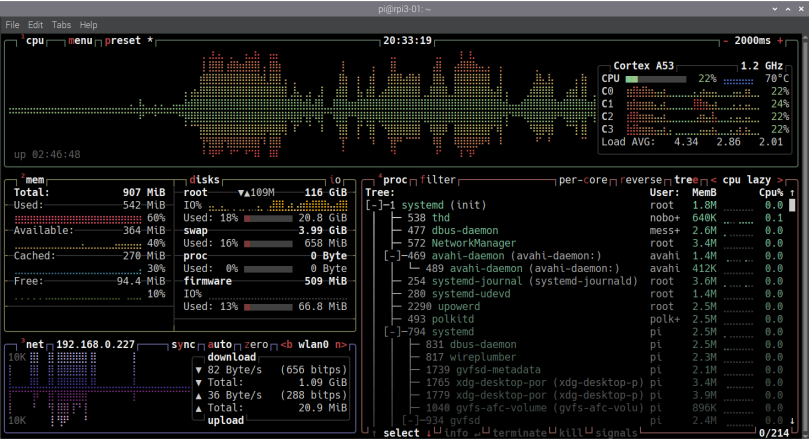
Note that this is the current release of Raspberry Pi OS at the time this post was written. Also note that this Raspberry Pi was limited to 907 MiB, a little less than the 1 GiB of memory soldered to the board. The reason for the memory haircut down to 907 MiB is because it’s being used as the graphics buffer for the video display.

I managed to get btop installed and to get it running so I could keep an eye on how the RPi 3 was behaving. You should now note that I have defined 4 GiB of swap space on the board (look in the disks box). When Raspberry Pi OS is installed “out of the box,” it’s configured with only 512 MiB of swap space total. It didn’t take much work with the default swap space to have applications crash out due to memory and swap exhaustion. Once again I had to edit /etc/dphs-swapfile to get my 4 MiB of swap.
# /etc/dphys-swapfile - user settings for dphys-swapfile package# author Neil Franklin, last modification 2010.05.05# copyright ETH Zuerich Physics Departement# use under either modified/non-advertising BSD or GPL license# this file is sourced with . so full normal sh syntax applies# the default settings are added as commented out CONF_*=* lines# where we want the swapfile to be, this is the default#CONF_SWAPFILE=/var/swap# set size to absolute value, leaving empty (default) then uses computed value# you most likely don't want this, unless you have an special disk situationCONF_SWAPSIZE=4096# set size to computed value, this times RAM size, dynamically adapts,# guarantees that there is enough swap without wasting disk space on excessCONF_SWAPFACTOR=2# restrict size (computed and absolute!) to maximally this limit# can be set to empty for no limit, but beware of filled partitions!# this is/was a (outdated?) 32bit kernel limit (in MBytes), do not overrun it# but is also sensible on 64bit to prevent filling /var or even / partitionCONF_MAXSWAP=4096
Lines 16, 20, and 26 are the lines I modified. So with those modifications I managed to keep more applications up and running, although not very many. As you can see in the btop capture, I’d already reached 658 MiB of swap used, and that was with a web browser (Chromium in this instance) and several terminal windows.
Speaking of web browsers, I tried three on that combination of hardware and software; Firefox, Chromium, and Gnome Web, a.k.a. Epiphany. Of the three I discovered that Gnome Web was the worst, consuming the largest amount of swap, and that it crashed far more than Firefox or Chromium. All I wanted was a web browser to be able to search for and read documentation for certain problems I was encountering while working with this setup. Gnome Web was the least helpful in this regard.
I also had to change from using Wayland to using X11 as the desktop engine. The primary reason for the change is that there are no working screen capture tools under Wayland, but more than a few for X11. After switching to X11 I installed gnome-screenshot (bit of irony there considering how bad Gnome Web was), which allowed me to capture specific application windows for documentation purposes.
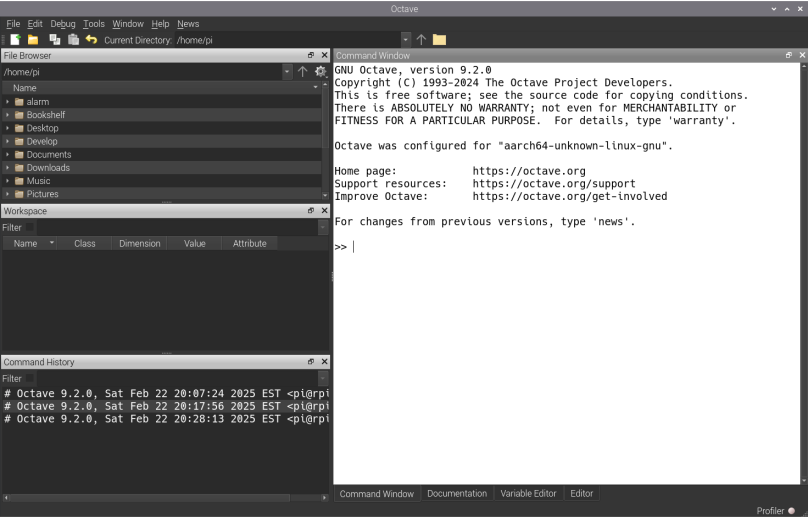
After spending far more time than I should have tweaking the constrained environment, I tried to install GNU Octave, because that’s what the Raspberry Pi Sense Hat documentation calls for. There’s a tool in the installation for calibrating the various sensors on the Sense HAT. What I discovered is that the version of GNU Octave is still at 7.3.0, while the version you can get off the Octave website is 9.3.0. I managed to install a more up to date version of Octave via flathub, version 9.2.0;
I opened the application and discovered that it’s quite fast in that environment, amazingly so compared to either Chromium or Firefox. Since this is from the flatpak, I need to investigate how to get the calibration tools out of the flatpak. I have the Octave flatpak installed on my Linux Mint system so I’ll investigate there rather than on the Raspberry Pi 3.
And that’s about it for the moment. I am wondering if I should install the light weight 32-bit version of Raspberry Pi OS onto the Raspberry Pi 3. After all, Raspbian was 32-bit on RPi 3. Or maybe I should put the Sense HAT on a 1 GiB Raspberry Pi 4 I found in my collection and install 64-bit Raspberry Pi OS on that. Decisions, decisions…
Links
Raspberry Pi Sense Hat Documentation — https://www.raspberrypi.com/documentation/accessories/sense-hat.html
GNU Octave — https://octave.org/


[…] attempting to restore an old raspberry pi […]
LikeLike