
In the first two parts we attempt to build an Android calculator app (part 1 here, part 2 here). We covered background material and the app design at a very high level. Part 2 started to cover some of the code; it listed the styles XML file. Part 3 wraps up the code examples and the series as a whole.
Up to this point I’ve mentioned three keys files used by this application: activity_main.xml, styles.xml, and MainActivity.java. Their relationship is shown in the following diagram.
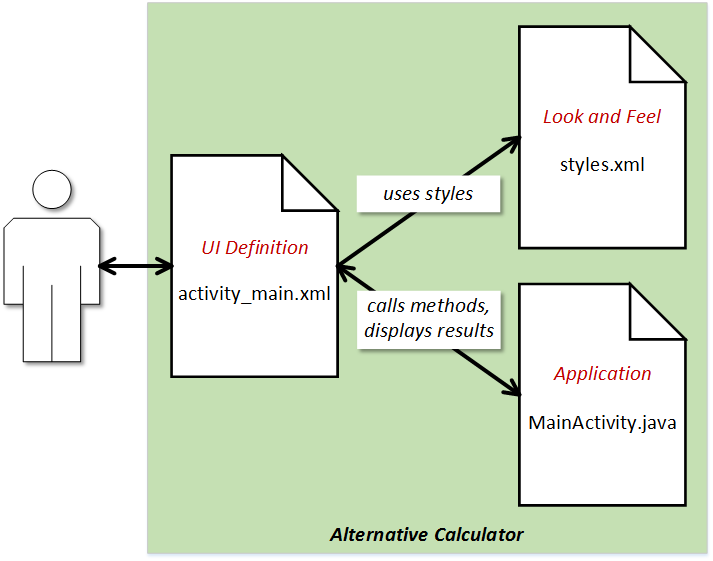
There are more files in this project, such as the top level Android manifest, but the files that I’ve dealt with primarily are those three.
Layout is defined by activity_main.xml (app/src/main/res/layout/activity_main.xml). It’s XML based, with tag attributes defining specific configuration, color, font, and other important details. The way XML is used in this application is as if Google merged cascading style sheets (CSS) with HTML. This is a far cry from the early days of HTML when you had specific tags such the font tag and the forever cursed blink tag. Now you a handful of tags and define all your characteristics with adroid:[whatever] attributes on each tag.
I used LinearLayout to get the buttons to line up the way I wanted them to. For the top level I added the android:orientation attribute to the LinearLayout tag and set it to vertical. For the buttons I nested additional Linear layouts using the default android:orientation attribute of horizontal. The figure below gives a high-level view of this layout.
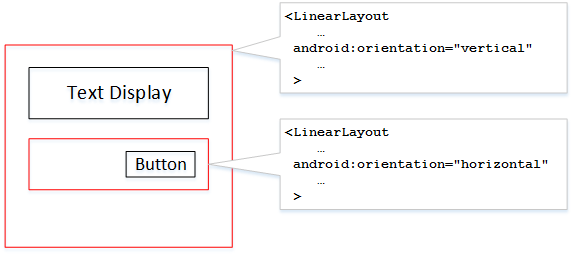
Remember that there’s four buttons per row and multiple rows of buttons/keys. Here’s a partial listing of activity_main.xml file; you’re looking at the top level LinearLayout definition, the display (TextView), and one LinearLayout for a row buttons;
<LinearLayoutxmlns:android="http://schemas.android.com/apk/res/android"xmlns:tools="http://schemas.android.com/tools"android:layout_width="match_parent"android:layout_height="match_parent"android:orientation="vertical"android:paddingLeft="@dimen/activity_horizontal_margin"android:paddingRight="@dimen/activity_horizontal_margin"android:paddingTop="@dimen/activity_vertical_margin"android:paddingBottom="@dimen/activity_vertical_margin"tools:context=".MainActivity"><TextViewandroid:text="@string/hello_world"android:layout_width="fill_parent"android:layout_height="wrap_content"android:textSize="30sp"android:id="@+id/display"android:background="@android:color/holo_red_dark"android:textColor="@android:color/white"android:textStyle="italic" /><LinearLayoutstyle="@style/CalcButtonLayoutStyle"><Buttonandroid:text="INV"android:onClick="toggleInverse"android:id="@+id/inverse"style="@style/CalcButtonStyle" /><Buttonandroid:text="lnX"android:onClick="calculateLog"android:id="@+id/backspace"style="@style/CalcButtonStyle" /><Buttonandroid:text="CE"android:onClick="clearEntry"android:id="@+id/clearEntry"style="@style/CalcButtonStyle" /><Buttonandroid:text="C"android:onClick="clearAll"android:id="@+id/clear"style="@style/CalcButtonStyle" /></LinearLayout>...</LinearLayout>
One very nice feature of using XML are styles. As noted in Part 2, I have three defined styles in styles.xml. Here’s styles.xml again:
<resources><!-- Base application theme. --><style name="AlternativeCalculatorTheme" parent="android:Theme.Material"><!-- Customize your theme here. --></style><style name="CalcButtonStyle" parent="android:Theme.Material"><item name="android:layout_width">wrap_content</item><item name="android:layout_height">wrap_content</item><item name="android:textSize">20sp</item><item name="android:textAllCaps">false</item></style><style name="CalcButtonLayoutStyle" parent="android:Theme.Material"><item name="android:layout_width">fill_parent</item><item name="android:layout_height">wrap_content</item><item name="android:layout_gravity">center</item><item name="android:gravity">center</item><item name="android:paddingTop">2sp</item></style></resources>
The styles used in activity_main.xml are CalcButtonStyle and CalcButtonLayoutStyle. What makes styles so powerful is that they allow you to gather attributes that would be cut and pasted multiple times into one location, and then refer to those same attributes using the style=”@style/CalcButtonStyle” for the Button or style=”@style/CalcButtonLayoutStyle” for the LinearLayout. Features like the style attribute help to declutter code. It also allows for any changes to be made in just one location and apply everywhere the style is used. The style is a lot like a CSS style.
Another XML attribute is on each one of the buttons: android:onClick. This is a reference to a class function on the MainActivity Java class. The class function returns void and accepts a View argument. Here’s a section of code from MainActivity showing the four class functions referenced in the activity_main.xml file above:
public class MainActivity extends Activity {...public void toggleInverse(View view) {inverseSet = !inverseSet;}public void calculateLog(View view) {if (!inverseSet) {xRegister = Math.log(xRegister);}else { xRegister = Math.exp(xRegister);}inverseSet = false;isWaitingForOperandStart = true;display.setText(decimalFormat.format(xRegister));}public void clearEntry(View view) {initializeCalculator(false);}public void clearAll(View view) {initializeCalculator(true);}...}Each of the class functions listed in the activity_main.xml fragment is defined in the MainActivity Java class. When the associated button is activated then the class method is called. Linking an arbitrary code function to a GUI element is a class architecture design. I’ve worked with similar in the past, from Visual Basic to X11 widget callbacks to CICS exits written in COBOL and IBM 370 Basic Assembly Language in the early 1980s. Solving the same problem across the decades with different software solutions.
Wrapping Up
Writing this helped to clear up a number of minor issues for me, not the least of which is how to link the UI to the backend Java code. I’m deciding now just how far to go with this application, whether to finish it up including the algebraic notation engine using the left and right parenthesis. Or perhaps I’ll just say never mind and go back reverse Polish notation and replace the equals key with Enter.
I could make pro and con comments about using Android Studio, but it wouldn’t change things in Android Studio. I’ve learned to work around the annoyances and incorporate it into my development work flow with the tool. I can get the work done now with minimal aggravation. And at the end of the day there’s the basic truth that there is no perfect development IDE. They all have their various flaws. As long as there’re not show stoppers, complaining about them is a waste of time better spent in development.
Observations
- I mentioned HTML. Writing this reminded me of writing server-side web pages in JSP, ASP, and PHP. That is, there were references to specific functions or class methods to be called when the user interacted with the web page. I don’t want to carry this analogy too far, but the reminders are pretty strong, at least to me.
- The XML appears to be language agnostic. Since Oracle seems hell-bent on a scorched earth policy with regards to Google’s use of Java, it wouldn’t surprise me if Google moved away from the official use of Java. They took one big step with Android Runtime (ART) which replaces Dalvik and compiles directly to ARM native instructions. Google has at least two other high-level languages they could transition to, Javascript (via V8) and Go.
- After getting my head straight with regards to writing contemporary Android apps, it’s a lot more straightforward than earlier versions of Android.
- I know this doesn’t even begin to scratch the surface of Android development. But it’s a start, and a key understanding. It’s enjoyable now.

You must be logged in to post a comment.