
Before You Begin…
How to install Java on Yosemite: adding java and java-supported development tools to os x yosemite
Basic Android project creation: creating an android project with android studio on yosemite
Looking Before You Leap
Before I wrote my first line of code I searched the web for any Android calculator examples. I did find a few. They were all some number of years old, and they used older coding techniques for writing Android applications. One technique they all used that I didn’t care for was the use of strings to store all numeric values, converting back to an intermediate number to perform the calculation. Once the calculation was finished it was converted back to a string for display. I also took issue with their terminal design; they were all, without exception, simple examples that could only be extended with a lot of work. If I was going to go that that kind of trouble, then I might as well start over and learn a bit more in the process. Whether what I’ve designed and written is any better can only be determined by peer review.
Internal to the app I use a pair of double variables, xRegister and yRegister, for all numeric results. Using doubles avoids the issue of precision loss due to back-and-forth string conversion. For example performing the operation “1 ÷ 3 × 3” will return 1, instead of 0.999999… This simple illustrative example shows that by keeping all numeric values (initial, intermediate, and final) as doubles, especially during a long chain of calculations, produces a more accurate final result. How you display the final result (how many digits to the right of the decimal) will determine how the decimal portion is rounded up or down in the display only. But it won’t effect the real double value.
The internal design is almost a stack-based machine. I say “almost” as the two double variables, xRegister and yRegister, are used to hold operand input and results.
- When entering a number, the xRegister is used to construct the operand from individual button/key presses.
- When an two-operand operation key (add, subtract, multiple, or divide) is pressed, then the first operand is considered finished and pushed (moved) to the yRegister. The second operand is built up in the xRegister.
- When the equal key or a second two-operand operator key is pressed, then the current pending operation is executed and the results are in both the xRegister and yRegister. This allows simple chaining of operations, and allows the log function to execute against anything in the xRegister, as you would expect. All string results are produced using the java Format class and then placed in the display.
- For the single operation log or Inv log, the operation is performed on the contents of the xRegister and left there. Once again the initial operand is considered finished and the results left in the xRegister for further operations or chaining.
The application is based on the Blank Activity, the simplest template. Build and load the project as-is into your Android device of choice and you wind up with “Hello World” being displayed. And that’s it.
Trail of Annoyances
If you’ve been around long enough then you may recall the various learning trails that Sun Microsystems created during the heydays of Java. The trails were the initial canonical way of writing Java, providing many useful examples for many complex concepts and classes. Google has tried to do the same with Android, but their efforts by comparison are a lot leaner than what Sun produced. To top it all off Android is evolving at such a high rate that many of the examples that do exist seem to be falling behind what is the latest release, especially with regards to proper coding and usage standards. Trying to follow along with the Android examples leads to annoyances when things don’t quite work as advertised.
An example of this is styles.
When you create your initial project you’re given the absolute minimum to get you started and no more. That’s great if you’ve had some experience developing Android, not so much if you’re just starting and needing a bit more hand holding.
One of the minimal files is styles.xml (app/res/values/styles.xml). In that file is a default style named “AppTheme”. That style is referenced in the top-level Android manifest file. The only entry in AppTheme is a reference to the parent theme. The default parent theme is “android:Theme.Holo.Light.DarkActionBar”. If you want to use Material Design, then you need to change that to “android:Theme.Material”. But that’s not all.
It appears that the default theme name will not enable any theme you might create because the default AppTheme appears to be hidden by some other AppTheme. In order to get my app theme to override what appears to be the default, I had to change the default name to something else, in this case “AlternativeCalculatorTheme” in styles.xml, and then to make sure it was properly changed in AndroidManifest.xml (app/manifests/AndroidManifest.xml). Once that was done themes worked as advertised. Here’s what the theme currently looks like.
<resources><!-- Base application theme. --><style name="AlternativeCalculatorTheme" parent="android:Theme.Material"><!-- Customize your theme here. --></style><style name="CalcButtonStyle" parent="android:Theme.Material"><item name="android:layout_width">wrap_content</item><item name="android:layout_height">wrap_content</item><item name="android:textSize">20sp</item><item name="android:textAllCaps">false</item></style><style name="CalcButtonLayoutStyle" parent="android:Theme.Material"><item name="android:layout_width">fill_parent</item><item name="android:layout_height">wrap_content</item><item name="android:layout_gravity">center</item><item name="android:gravity">center</item><item name="android:paddingTop">2sp</item></style></resources>
Again the AlternativeCalculatorTheme has only one item, the parent theme android:Theme.Material. The other two themes, CalcButtonStyle and CalcButtonLayoutStyle, are for other controls and containers in activity_main.xml (res/layout/activity_main.xml). We’ll talk about this more in part 3.
The User Interface
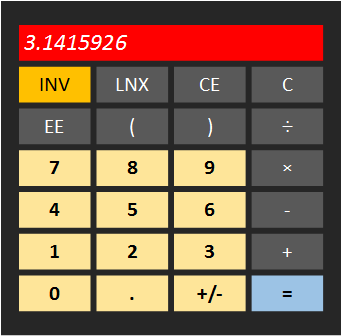 I used a drawing tool, Visio on Windows, to build a quick layout. I used the various colors more for my benefit to help keep things straight than as a definitive design choice. The only colors that have come through so far in the application are the display and the background, and the white-on-gray keys. I believe in making it work properly, then making it look pretty. Along the same lines as make it work, then make it fast.
Contemporary Android uses XML heavily to describe the layout and order of the visual elements in an application, almost like a web page’s HTML. The Blank Activity template uses a Relative Layout in the activity_main.xml. I tried to work with that layout using Android Studio’s design view (see below)
 For this screen capture I configured activity_main.xml’s editor into two vertically split panes, setting one pane on text and the other on design. If you look at the text editor portion you’ll note that the Relative Layout has been changed to a Linear Layout. The reason for switching layouts can be shown
  to the right.
Note how the buttons, representing keys, are not aligning very well, especially the division key when using the Relative Layout. I found that no matter how carefully I move the buttons around in the Design view, or the order in which they were dropped on the Design view, the buttons would move all over the background and create situations where I’d get error messages from the Designer about circular dependencies.
After a three hour edit session on afternoon with this stage of the development, I finally got the design to the point where the Designer wasn’t complaining. But when I tried to side load the app on my Samsung Galaxy S4 for testing it immediately aborted. The S4 is currently running Samsung’s version Android 5.0.2. For my purposes that’s just fine. I have a trio of Nexus 7’s for Android 5.1/5.1.1.
When I couldn’t quickly find out what was causing the problem with the layout, I finally threw in the towel and started whole-sale hand editing of the XML code using the split view you see above. As I made changes in the Text view they showed up automatically in the Designer’s view. I use Linear Layouts throughout, using an outermost one vertically oriented for the overall layout and nested Linear Layouts with horizontal orientation for the rows of buttons. It took me about 20 minutes to re-write activity_main.xml in this manner. Once I did that the layout behaved the way I expected it to, and I moved on to writing the code behind the interface.
What’s Next
The final installment. More XML is shown along with the Java code. And we’ll wrap up with some pros and cons.
Android Studio Update
While writing this entry Android Studio updated from 1.2 to 1.2.1.1.

[…] ← trying to build a better android application (part 2) […]
LikeLike