
In the last post I wrote about installing PyQt5 and then playing with it a bit. Nothing serious, just my first stumbling starts to work in the PyQt5 environment. These next two examples are a tad more sophisticated, and introduce one or more surprises along the way. So let’s start out with a simple dialog with three buttons.
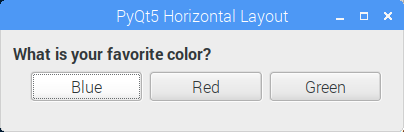
As you can see, not much there. The purpose of this simple dialog is to present these three push buttons. The only thing they do is to print a message when each one is pushed. The added feature with this example is to link each QPushButton instance with itself such that when any of the buttons are pressed, the console message explicitly says what button was pushed. For example, press the Blue push button and “PyQt5 Blue button clicked.” is displayed on the console command line. The same when you press Red and Green. How is this possible? Let’s look at the code.
#!/usr/bin/env python3import sysfrom PyQt5.QtWidgets import (QApplication,QPushButton,QHBoxLayout,QGroupBox,QDialog,QVBoxLayout)class App(QDialog):def __init__(self):super().__init__()self.setWindowTitle('PyQt5 Horizontal Layout')self.setGeometry(100, 100, 400, 100)self.createHorizontalLayout()windowLayout = QVBoxLayout()windowLayout.addWidget(self.horizontalGroupBox)self.setLayout(windowLayout)self.show()def createHorizontalLayout(self):self.horizontalGroupBox = QGroupBox("What is your favorite color?")layout = QHBoxLayout()buttonBlue = QPushButton('Blue', self)buttonBlue.clicked.connect(lambda: self.on_click(buttonBlue))layout.addWidget(buttonBlue)buttonRed = QPushButton('Red', self)buttonRed.clicked.connect(lambda: self.on_click(buttonRed))layout.addWidget(buttonRed)buttonGreen = QPushButton('Green', self)buttonGreen.clicked.connect(lambda: self.on_click(buttonGreen))layout.addWidget(buttonGreen)self.horizontalGroupBox.setLayout(layout)def on_click(self, pushButton):print('PyQt5 {0} button clicked.'.format(pushButton.text()))if __name__ == '__main__':app = QApplication(sys.argv)ex = App()sys.exit(app.exec_())The key to the self-identifying buttons is in lines 29-30, 33-34, and 37-38. Each button is a unique instance, and when the connect function is called, the argument is a functional call (hence the lambda) to a Python method that takes one argument (see line 43). In that function, on_click, the function identifies the button by calling each instances text() function to get the identifying text and incorporate it (via string formatting) into the complete message. If I wanted to I could add additional logic inside on_click to actually do something based on the text value of the button. Of course this only works if each button is unique, but in a given practical instance, they should all be.
The next little PyQt5 app takes this a bit farther with nine push buttons in a grid pattern, similar to numeric keypad.

In the grid example, pressing any of the buttons will self-identify as before. The way this was set up, however, is a bit different than how the first app/dialog was set up. In the dialog each button was explicitly created and then linked to the the on_click callback. In this instance we gets a little fancy with some of Python’s interesting capabilities to create the nine buttons in the grid format.
#!/usr/bin/env python3import sysfrom PyQt5.QtWidgets import (QApplication,QWidget,QPushButton,QHBoxLayout,QGroupBox,QDialog,QVBoxLayout,QGridLayout)class App(QDialog):def __init__(self):super().__init__()self.setWindowTitle('PyQt5 Grid Layout')self.setGeometry(100, 100, 320, 100)self.createGridLayout()self.windowLayout = QVBoxLayout()self.windowLayout.addWidget(self.horizontalGroupBox)self.setLayout(self.windowLayout)self.show()def createGridLayout(self):self.horizontalGroupBox = QGroupBox("Grid")self.layout = QGridLayout()self.layout.setColumnStretch(2, 4)self.layout.setColumnStretch(1, 4)for label in "123456789":self.makeButton(label)self.horizontalGroupBox.setLayout(self.layout)def makeButton(self, label):button = QPushButton(label)button.clicked.connect(lambda: self.on_click(button))self.layout.addWidget(button)def on_click(self, pushButton):print('PyQt5 {0} button clicked.'.format(pushButton.text()))if __name__ == '__main__':app = QApplication(sys.argv)ex = App()sys.exit(app.exec_())The key to setting this up lies in lines 34-35 and the function makeButton starting on line 39. Python makes it so easy to create a sequence of calls based on the number ‘1’ through ‘9’ just by iterating over a string with all the numbers. The makeButton function then creates the nine buttons with the unique label name, puts them in the grid, and of course provides the same self-reference for the click event like I did in the first app. Now when I click on any button, say the ‘1’ button, I get ‘PyQt5 1 button clicked.’ Every other numbered button self-identifies with the label it was created with.
The reason this is written in this manner is because, when I had the contents of makeButton inside the for loop, it would make each unique button, but the on_click would only print ‘PyQt5 9 button clicked.’ for every button pushed. It drove me crazy, and I still don’t know why it didn’t work running inside the for loop. Maybe I’ll figure it out later, but for now, this works, and you could say it’s the better software design because of how its all broken out.

You must be logged in to post a comment.